Friday, December 6, 2013

K2P2 Ribbing to K1P1 Ribbing

I'm sitting around waiting for the storm they've been predicting all week...combination of sleet, ice and snow. I'm hoping it misses us.

I am going to try and make posts during December but I'm not promising anything.  I have so much to do....all self-imposed so I won't complain.  I like to make about 20 different cookies for my friends and family.  I enjoy it but it does take a bit of time.  I've found a few new recipes I want to try as well.

STUDENT NEWS
Several students wanted to clear their desks before the holidays so I had more lessons to review than I thought.  I never mind reviewing lessons.  Keep me busy!  I've had a few inquiries about whether students can continue if they've let time slip.  Of course you can!  As long as I am the instructor of the course, I will review the work.


TIP OF THE WEEK
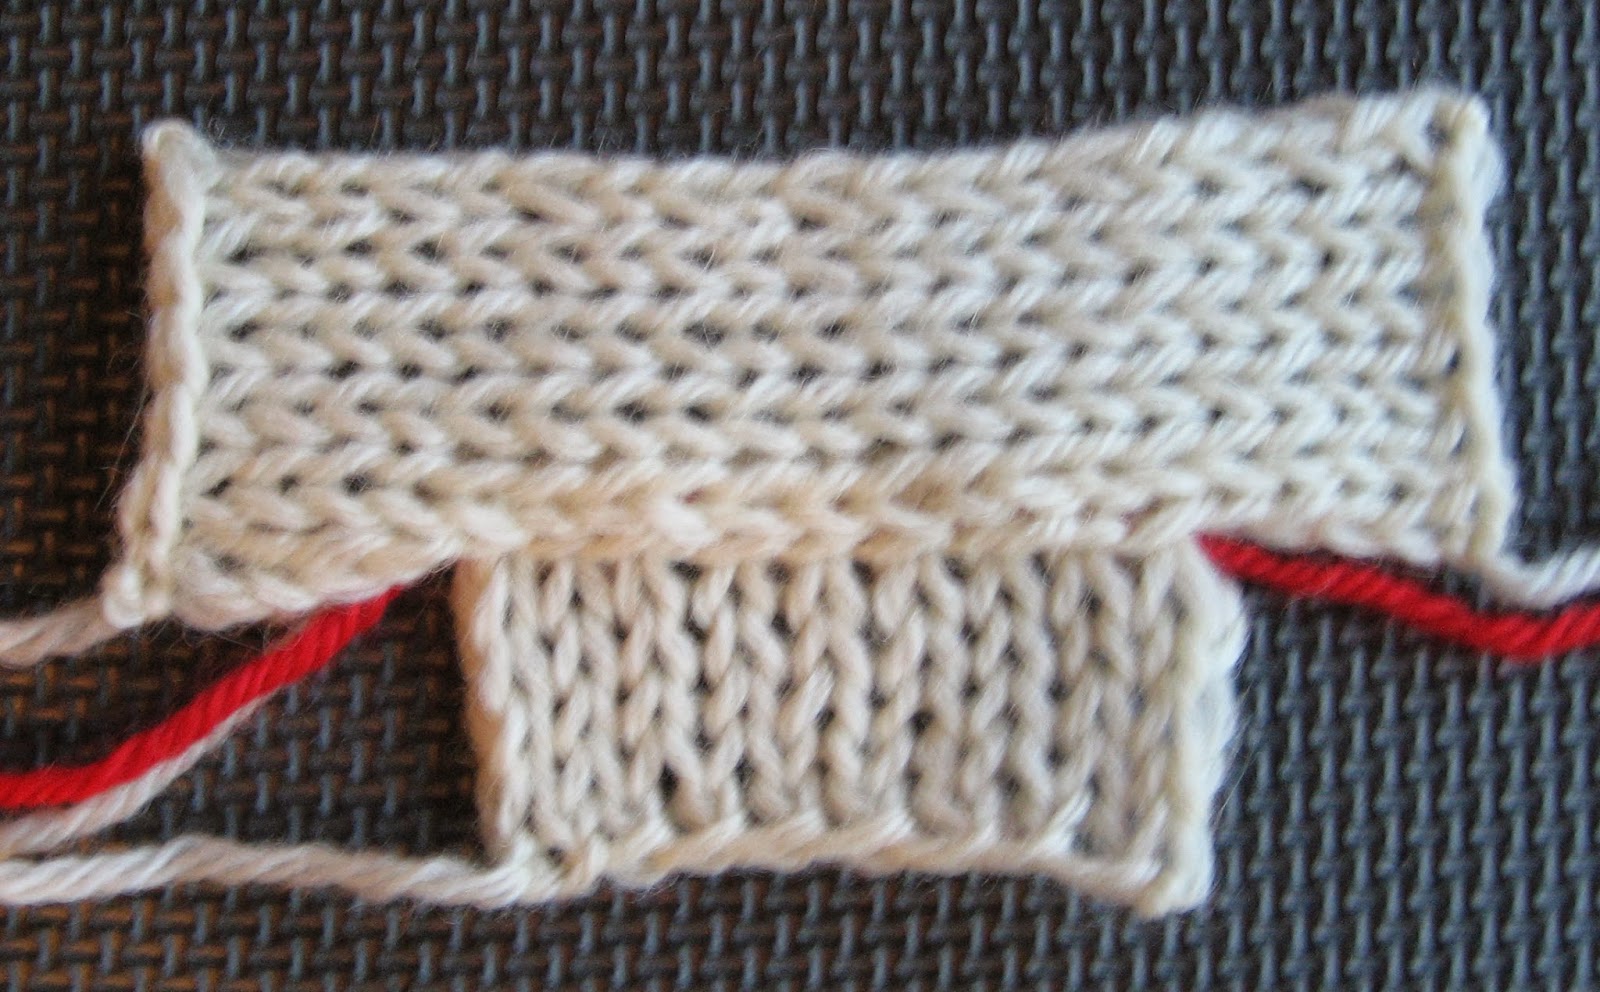
This week's tip is very simplistic.  In the last Tip I discussed tubular binds offs.  Although you can work a tubular bind off on K2P2 ribbing, I've found them less than desirable.  What I do is convert the K2P2 ribbing to K1P1 ribbing on the last row before the slipped stitches.  The video shows this technique which is very simple.  K2P2 ribbing to K1P1 ribbing

The photograph below shows a tubular bind off where I did this.  This is the top of a fingerless mitt I made last year.  If you look closely, you can see where the stitches have been cabled but it really isn't all that noticeable.  I find it better looking than the K2P2 methods I've tried.  


KNITTING SALON
The weather is supposed to be just awful on both Saturday and Sunday.  If anyone feels brave enough or if the storm isn't as bad as predicted, Salon will be on Saturday from 1:30-4pm.  Hope you can make it.

CURRENT PROJECTS
As always I am knitting close friends and family members small gifts.  I have been knitting up a storm.  Before I started the holiday gifts I finished up a baby and big sister gift for two special girls.  I thought the holly leaves made it seasonal.  The girls have a very talented grandmother who can take off the leaves and replace them with something else after Christmas.


Since I know none of the gift recipients read this blog I can identify them.  (This will help me next year to remember what I knit!)  These are for Kim.  I haven't made her socks for quite some time.  I used the same bow tie pattern.  I really like this one.

These mitts are for Cara.  She is fond of Tiffany Blue.  This is yarn left over from socks I made her several years ago.  (Breakfast at...socks,  http://www.ravelry.com/projects/arendje/breakfast-at).  I'm making a hat as well.  I was hoping I had enough yarn but to be on the safe side, I've ordered another skein from Miss Babs.


My niece and sister want mittens so I came up with this classic design.  Since they only take a few hours to do, I got enough yarn for matching hats.  (Berroco Ultra Alpaca)

These are for Martha.  The photo doesn't do the yarn justice.  First of all, it is purple and Second, it has sparkles.  Martha is about the least likely sparkly person I know so I thought she'd get a kick out of them.


I still have quite a few presents to go.  Good thing I am a fast knitter.  If I could stitch to one pattern, it would go MUCH faster.  I must have ripped out that mitten five times!

Friday, November 22, 2013

Tubular Bind Off

I decided I owed Petipa a photo.  Please don't think I am one of those crazy cat people who order furniture for their pets.  My daughter ordered this couch on-line when she got her first job.  She thought she was getting a standard size couch.  We decided to keep it for the cats.


These two photos show the difference between George and Petipa.  Besides being much larger, George is also a lounger.  He looks like he is about to ask for a beer.


STUDENT NEWS
It was a slow week.  I reviewed several lessons and that was all.  Plenty of time for knitting.


TIP OF THE WEEK
My current project determined the tip for the week.  I was finishing up a toe-up sock with a tubular bind off.  I prefer knitting toe-up socks as you can try them on in progress.  One of the problems is the cuff.  If you use a regular bind off the top of the cuff will be very inelastic.  There are several techniques you can use but I think the tubular technique is the most attractive.  


Tubular bind offs work best with K1P1 ribbing.  Yes, there are techniques you can use for K2P2 ribbing but I haven't found them very satisfactory.  The columns of stitches tend to slant.  I find it easier to convert the K2P2 ribbing to K1P1 ribbing on the last row.  (I'll show how to do that in my next tip.)

The first step is to work 2-4 rows where you slip every other stitch.  The stranding for the slipped stitches is what makes the bind off so elastic and gives it the tubular appearance.  When you are doing this in the round as you would for socks, you knit the stitch, bring the yarn forward, slip the next stitch which is a purl.  Repeat this until all the stitches in the round are worked.  For the next row, you have to reverse this.  You purl the stitch, bring the yarn to the back, slip the next stitch which is a knit stitch.  You can repeat these rounds again if you want a more tubular edge.

You then cut the yarn and thread it onto a tapestry.  I tend to leave a very long tail.  I once cut it too short.  Trust me, you don't want to do that.  To begin, you insert the tapestry needle knitwise into the first purl stitch.  Pull the yarn tight.  Next insert the tapestry needle purlwise into the knit stitch to the right of the purl stitch you just worked and then into the knit stitch to the left of the purl stitch.  Pull the yarn tight.  Insert the tapestry needle purlwise into the purl stitch between the two knit stitches you just worked.  Drop the purl stitch and the knit stitch to the left from the needle.  This isn't as complicated as it seems.  Once you get into a rhythm, it is easy.  Here is the video:  Tubular Bind Off

KNITTING SALON
Salon will be on Sunday from 2-4pm.  I have to drive to the airport on Saturday.  


CURRENT PROJECTS
I finished up another pair of birthday socks.  I would have finished much sooner if I hadn't changed my mind about the stitch pattern when I had knit half a sock.  I have used this stitch pattern before and I love it.  I call it gumdrops.


I'm not sure I will do a blog next week.  It depends on how tired I am after doing Thanksgiving dinner.  I realized yesterday I really haven't cooked much since my hand surgery.  I am hoping it is better this year.  Last year was pretty grim.

Friday, November 15, 2013

Zippers

I haven't put in an obligatory cat photo for quite some time.  Here is George enjoying the sun.  He is giving Petipa the evil eye after taking spot on the chair.


I spent the week catching up on things that should have been done months ago.  Luckily, I didn't get too many lessons to review.  I had a TON of emails, however.  I've expanded my duties at TKGA this past month and I had no idea how that would impact my in boxes!

STUDENT NEWS
We've decided to add a page to Cast On devoted to correspondence courses.  Those that complete courses will be listed on that page.  We are also going to have a page for the Masters Program.  These changes will be in the Summer issue.  It was a little too late to get them into the Spring issue.


TIP OF THE WEEK
I realized AFTER I had posted the tip last week that I had already done a tip on the topic.  Oh, well.  I guess it wouldn't hurt to check the topics BEFORE posting.  This week I am discussing zippers.  I don't require students to put in a zipper for the Professional Finishing Course but I do have it as an extra exercise if they want.  

The biggest problem with putting zippers in knitted garments is that knitted fabric is stretchy and zippers are not.  Another issue is that the teeth of the zipper can snag and tear the yarn.  Carefully consider the yarn, the stitch pattern and the resulting knitted fabric.  Will the weight of the fabric cause the fabric to sag on either side of the zipper? Is the yarn so fuzzy that it will get caught in the teeth?  Consider alternate forms of closures if the zipper will not enhance the design.  

It seems to be harder and harder to find full-service fabric stores which have much of a selection for zippers.  I now get zippers on line.  Zipper Stop has a huge selection of all types and colors of zippers.  You can even customize the length.  Some knit the garment first and others get the zipper and knit to its length.  It is pretty much up to you.  

As you knit the garment, you should consider the edge where the zipper will be placed.  A standard selvedge can be pretty ugly and a bit lumpy.  I generally slip the first stitch for the edges where the zipper will be placed. This creates a decorative edge and provides a seam line as well.  For the sample, I picked up and bound off a row of stitches in a different color to provide an edge.  The seam is placed in the center of each white stitch.


I do not use a sewing machine to put in the zipper, mainly as I am not a very good seamstress.  I find it easier to put the zipper in by hand.  In any case, the process is to baste the zipper in place first and then sew it in.  Be sure not to have the stitches that might interfere with the zipper teeth.  In the photograph above you can see that I line up the stitches next to the teeth.  

I used a back stitch to ensure that the zipper wouldn't slip as this photo shows.


Here is this week's video:  Zippers


KNITTING SALON
Salon will be on Saturday from 1:30 to 3:20.  No opera this week.  UK does have a football game but it isn't in town.  If I have a request, I will turn the tv on to the game.


CURRENT PROJECTS
I have blocked the yellow socks but I am going to put off weaving in the yarn tails.  For each row of flowers there are four yarn tails.  I don't like carrying up the yarn.  It doesn't do the tension any favors.  The photograph doesn't do the yellow justice.  It is a beautiful buttercup.


I've started on birthday socks which I will finish up before starting holiday gifts.  Luckily, the new cycle of Cast On garments doesn't start until early December.  I am going to try and show some restraint in my proposals.  Jan choose this Madelinetosh yarn for her socks.  She is branching out from GRAY!  I had some  trouble finding a stitch pattern I liked.  The yarn is so dark it obscures any design.  (It photographs MUCH lighter...the name of the color is Ink.) I am calling them  Bow Tie socks.  Yes, I am sure it is an existing pattern I just haven't taken the time to research it.  The pattern I used originally (and knit half of the sock with) had the reverse stockinette beginning immediately after the cable.  I like this one much better.


Here is a close up of the stitch pattern.  


Friday, November 8, 2013

Picking Up Stitches on a Horizontal Edge

I'm back from my travels and don't plan on going anywhere for a while.  I had a great time in west Texas.  I especially enjoyed Big Bend National Park and Marfa.  As soon as I got home I had to get ready for the photo shoot.  I was afraid I wouldn't have time to finish up everything but I made it just under the wire.  The photo shoot was a three-ring circus.  The Fashion Framework article for the issue is about dog sweaters and we had two Teacup Yorkies as models.  We also had 2 year old model.  We got some great photos of all.  My twin set and skirt looked great on the model.  I managed to snap a photo.


I loved how the skirt turned out.  I am going to do a matching jacket for the next issue.  I was very surprised at how well the cables show up.  The yarn provides a very interesting tweedy texture.  Word is out in the industry that tweed is very hot.  I've been thinking about what I want to do for the next issue and I plan to do a tweedy argyle vest.

STUDENT NEWS
Several lessons were waiting for me when I got home.  It didn't take me long to get them out.  I really do not like to have students waiting very long for my letters.  I take pride in getting things back quickly.  It has been difficult this past month.


TIP OF THE WEEK
This weeks tip is about how to pick up stitches along a horizontal (bound off ) edge.  In a sweater, you generally find this type of edge in necklines.  Before I discuss how to do this, I should mention that many patterns suggest putting the neckline stitches on holders and then working the band.  I don't do this unless it is a baby sweater.  They have such pumpkin heads you need all the give you can get in a neckline to pull the sweater over there head.  If you bind off the neckline stitches, your neckband will have more support.  Test this by stretching live stitches and then stretching a bound off edge and you will see what I mean.  I think so many patterns have you do it this way rather than explain how to do it properly.  Anyway, I will get off my soapbox and get to the point.

Pick up stitches on a bound off edge in the center of the stitch BELOW the bind off edge, not IN the bind off or between the stitches.  The two photos belabor this point.


The stitches you pick up should continue the column of stitches below.  If you look closely at the photograph below you can see that the columns of stitches continue into the band.  It is little details like this that make something look "handmade" as opposed to "homemade."


If you pick up the stitches between the columns, it pinches the stitches together which results in the DREAD Elevens.


Here is the link to the video:  Picking Up Stitches.  Next week, unless someone has a special need, will be picking up stitches on a vertical (selvedge) edge.


KNITTING SALON
Salon will be on Sunday from 2-5pm.  Saturday is the HD simulcast of one of my favorite operas...not only is the music divine, it has all you want in an opera except a soprano dying of consumption.  You can't have everything.  I saw this production of Tosca a few years ago and it has some of the creepiest staging I've ever seen.  There is also a football game.  

CURRENT PROJECTS 
I posted a photo above of the skirt and twin set.  They really worked well together.  I did a pair of socks as well.  Jan suggested I call them "Mary, Mary Quite Contrary."  I had hoped to finish two colorways for the photo shoot.  I did get one pair done but the second pair was photographed "in progress".  


One of these are now done and I should have the other done by tomorrow.  Then I have birthday presents to do (you know who you are!)


Friday, October 25, 2013

Evenly Spacing Buttonholes

I had a lovely trip to Tucson.  The highlight of the trip were the javelinas who visited the patio most mornings.   I wasn't stupid enough to think I could interact with them, especially as there was a mother with babies.

I have been working like mad to finish up the garments for the photo shoot on November 6th especially as I will be out of town AGAIN next week.  It will be a close thing.

STUDENT NEWS
I'm sorry I couldn't list those that had completed lessons in my last post.  I have had some frustrations with Blogger lately.  This week it was a problem uploading photos.  I almost gave up.  I managed to review the lessons that had arrived while I was gone.  Several arrived during the week.  Again, I will be gone from Oct 26-Nov 1 but it generally doesn't take me long to get caught up.


TIP OF THE WEEK
Since I didn't have much time this week to devote to the tip I decided to use my current project...the cardigan for the twin set since I had to evenly space buttonholes on it.


I am not a bit fan of formulas in knitting, mainly since I am a math idiot but also I've noticed that some knitters rely solely on formulas and don't consider factors like the stitch pattern.  I prefer to treat each project individually.  The first thing I do before even thinking about where to place the buttonholes is to use my gauge  swatch to work a sample buttonhole.  This lets me see if the buttonhole will work with the stitch pattern and how many rows I will need to have the buttonhole centered in the band itself.  This also lets me know how many rows I will need to make the buttonhole.  Some buttonholes require several rows and if this is the case, this must be factored into evenly placing them.

Once you know the type of buttonhole I plan to make, I work the button band.  I write down the number of stitches I have picked up.  I make sure to work the number of rows I have determined I need for the buttonhole to be centered on the band.

Using the button band, I decide where I want the first and last buttonholes.  I count the stitches before the first buttonhole and those after the last one.  I subtract those from the total number of stitches.  I then divide the number of buttonholes I need between the first and last into the number of stitches.  This tells me the number of stitches I need between the buttonholes.  I use this as a ballpark number.  I put the buttons on the band and see how this looks.  I make changes as necessary.  I prefer to work with number of stitches.  If there are 20 stitches between some buttonholes and 21 between others it is not the end of the work.  I just work with it.

The video shows the process I went through with this sweater with one change.  In the video I worked it out for 6 buttons.  I realized after I made the video that the pattern (which I have already turned in) calls for 7 buttons.  OOPS!  It was easier to change the number of buttons than the pattern!  Evenly Spacing Buttonholes

KNITTING SALON

I will be leaving town so there won't be a salon this week.  We will resume on Sunday, November 3.  I am also missing the opera tomorrow.  The first opera was while I was in Charlotte and I was teaching that day.  I miss them.


CURRENT PROJECTS

I don't know what I was thinking when I signed on to doing the twin set.  I used size 3.00mm needles so it took forever and I had to rip things out several times.  Interesting thing about the mink...it has no memory so when you rip it out, it isn't kinked at all.  I wouldn't recommend this yarn for anything that requires body.  It was perfect for the twin set..really drapey.  Here are some photos of the completed garments.  The shell is very simple.


My cats love this yarn.  Anytime I put it down, one or both were sitting on it.  


I'm hoping to get the skirt done tomorrow.  It is a breeze after the cardigan.  Size 8 needles.  This photo is deceptive.  The skirt is 38" but George makes it look like a doll skirt.  The bottom band (cables) is knit separately and the stitches are picked up along the selvedge.  I think the contrast in textures.


There is a slit at the back.  I will be knitting socks for the magazine while on the trip.  Good thing I am fast.

Friday, October 11, 2013

Seaming a Horizontal Edge to a Vertical Edge

Google seems to be having some technical issues in text editing the gadgets (to the right).  I wasted about an hour or so thinking it was me.  I will try again later to update it!  Apologies to all, especially the students who have completed lessons.

The conference in Charlotte (or rather Concord) was great but tiring.  I taught every day and my students were wonderful.  It was a lot of work to get ready but it was worth it.  The yarn balls I wound with my nostepinne were a hit.  Laura Farson took Day 1 of my Finishing Class and gave me her seal of approval (unless she was just being nice!)

I won't be doing a blog entry next week.  I will be coming back from Tucson.  My husband has a meeting there.  It will be nice laying around doing nothing for a change.

STUDENT NEWS
There were a few lessons waiting for me when I got home but not too many.  Several knitters I met at the conference signed up for courses.  You would think they would be sick of me!

TIP OF THE WEEK
I have finally got around to the final seaming tip...horizontal to vertical edges.  You would use this technique primarily to sew a sleeve cap to an armhole opening.  To do this you need to know how to seam horizontal edges (bind offs) and vertical (selvedges).  I've already discussed these two techniques in previous tips.  Here are the links in case you need them:  Horizontal Edges and Vertical Edges.  On vertical edges you use the horizontal bars between the selvedge stitch and the next column of stitches.  On horizontal edges you place the seam in the stitch below the cast on edge. 

The only thing that complicates this type of seam is that there are more rows per inch than stitches.    This means you cannot pick up one row for every stitch or the seam will be puckered.  You need to use the gauge ratio.  For example, if your gauge is 4 sts and 5 rows per inch, that means you need to use up 5 rows for ever 4 stitches.  To do this, you use a single bar (each bar represents a row) for three stitches and on the fourth, you would use two bars.  The photograph below shows this.  (By the way, I knit these swatches using GIGANTIC needles so the tension isn't great).


If you look this technique up in a book you might find different ratios suggested.  I've seen 3:4 and 4:5 listed as hard and fast rules.  For the most part, both work but your actual gauge for one inch generally gives the best results.  Here is the final swatch. 


When you are seaming a sleeve to the armhole opening, always start at the shoulder seam.  Seam one side first and then the other.  If the sleeve is a drop shoulder sleeve, be sure to mark where the sleeve should line up on the other side of the garment.  It is very easy to wind up with one side of the sleeve lower on the body.  If it is a set-in-sleeve, pin it in place first the way you would if you were inserting a set in sleeve on a fabric blouse with a sewing machine. 

Sewing in a sleeve is more art than science.  I can honestly say I have never had one go in perfectly without some altering of the ratios at the armhole.  This reminds me of picking up stitches for a thumb.  It always requires a bit of fudging.  Don't worry too much about this.  Unless you are REALLY off, it is not all that noticeable.  Most of the fudging is done at the underarm. 

KNITTING SALON
There won't be a salon this week.  I will be traveling on Saturday.  See you in two weeks.

CURRENT PROJECTS
I didn't get near enough done at the conference.  I had very little time to knit.  This is somewhat ironic if you think about it.  I did finish the shell for the twinset before I left.  It is blocked but not seamed.  I've finished the back of the cardigan and the armholes are in sight for the front.  I must have the sleeves done next week to stay on schedule.  Here is the cardigan in progress.


It is wishful thinking, I suppose, but I did the gauge swatches for the skirt.  Yes, I know the swatch is really short but I am not too concerned about the row gauge.  The swatch to the left is for the skirt body.  The swatch to the right is for the border.  It is hard to tell but the border will be cabled.  Yes, I know you will not be able to see the cables but the texture will be different.  I decided to do this to add some weight to the bottom.  The bottom band will be knit separately and then stitches will be picked up along the vertical edge and worked in the round from that point on.  I will not seam the bottom band.  I want a slit at the back.  The yarn is Debbie Bliss Milano.  I like the contrast between this fabric and the twinset.


Friday, September 27, 2013

Using a Tapestry Needle to Improve Increases and Decreases

I am ready for the conference next week.  I have everything packed and ready.  I did do three sets of homework for both of the finishing classes.  That was a lot of knitting.  I feel like I should apologize to my students!  Day 1 in particular had so many swatches.  If you are going to seam swatches, you do need two.

I even have the candy for my classes.  I always provide chocolate for my students to help keep them awake.  No, the candy is not a bribe for good evaluations!

Since I will be in Charlotte next week, I will not be posting a blog entry.  I will be traveling quite a bit in October but I should be able to post a blog or two.

STUDENT NEWS
Three students completed Lesson 3 of the Basics Class this week.  They all came on the same day.  If you send me a lesson and you want me to email you a copy of my letter the day I review the lesson, I am happy to do so.  Just let me know.

As always, I cannot review lessons if I am out of town (I can process new orders, however.)  This is my travel schedule for October:

October 1-6--Charlotte
October 12-18--Arizona
October 26-November 1--Texas

My house sitter will take in any lessons that arrive during those times and I will review them the day after I get back.

TIP OF THE WEEK
This week's tip was a special request.  I frequently tell my students when I review their increase and decrease swatches that they can use a tapestry needle to clean up the increases or decreases when the swatch is finished.  This tip applies mainly to those who are working on the Masters Program or who are perfectionists! 

When you work increases or decreases the goal is that they don't stand out like a sore thumb from the rest of the fabric.  Most knitters are just happy that they can make increases or decreases, not that they are inconspicuous.  The best way to approach this is to work on the techniques so that the increases and decreases are an appropriate size, particularly if they are mirrored.  I have addressed these issues in prior blog entries.  No matter how you try, there are times when one or two of the increases/decreases stand out.  When that is the case, you can use a tapestry needle to work excess yarn from the increase/decrease out to the selvedge. 

The first step is to stand back three or four feet from the fabric and look at the increases and decreases to see if any stand out.  When you are working on something you may not even notice.  I always try to step back and take a quick look at my work.  You notice mistakes as well. 

The video (Using a Tapestry Needle) shows how to do this.  Do this before you block the piece.  The excess yarn at the selvedge will be hidden in any seams or edges with a band.  For swatches you are submitting for the Masters Program, WORK ON THE TECHNIQUES to make the increases/decreases an appropriate size.  Use this technique sparingly.  If you have half an inch of excess yarn at the selvedge in a swatch, it will be noticeable.

The two techniques which seem to produce larger stitches is the SSK and the left slanting lifted decrease.  I have several suggestions for ways to produce smaller results in the Tips I have done on those topics.


KNITTING SALON
Salon will be on Saturday this week as I want to have all day Sunday to complete my packing for the conference.  It will start an hour earlier so those who are going to the football game will have time to get ready. 

CURRENT PROJECTS
I feel like I spent most of the week knitting homework swatches but I did have time to work on the shell for the twin set.  I've finished the back and am on the home stretch for the front.  I decided to do a placket at the back.  I don't want a wide neck opening.  I'm hoping some button vendors will be at the conference.  I envision some sweet antique pearl buttons.


Friday, September 20, 2013

Purlside Increases

I spent the better part of the week getting my handouts ready for the conference in Charlotte.  Thanks to Laura Farson who convinced me to use a nostepinne to wind the balls of yarn for class.  Center pull balls are so much easier to work with.  It did take bit of time but I think I've got it now.  This is one of the kits.  I'm providing all the yarn needed for the course.  I've learned the hard way that some students can bring in yarns that are not quite right.  I've put in tags and a packet of the dental elastics as well.


I have also committed to doing homework for the finishing classes in case there is a last minute registration.  Generally I close my classes by this time.  We will see if it is worth it.

STUDENT NEWS
I received several lessons to review but no new students.  Just a reminder....I will be here all next week but the following week I will be in Charlotte.  I am traveling quite a bit in October.  I will also be gone the weeks of October 12-18 and October 25- November 1st.  If a lesson arrives during those weeks, I will review them when I come home.  I will not be posting a blog during those weeks as well.

TIP OF THE WEEK
This week's tip was a request.  When I did the videos for the double yarnover variations of the eyelet buttonholes, there were some questions about how to work increases on the purlside.  Whenever you work increases on the purlside, the first thing to ask yourself is if the purlside is the RS of the work, say for a cabled sweater.  If this is the case, you don't need to worry all that much.  It is difficult to tell the difference in different types of increases in purl stitches since the "slant" that is so obvious in knit stitches is obscured.  In the photograph below I have labeled the different type of increases (ignore those at the top for now.)  You have to look very closely to even see the increases.  Select the technique you like keeping mind that all you have to do is work the increase purlwise instead of knitwise.  So for a bar increase you would purl into the front of the stitch and then purl into the back.  For M1 increases, since the slant is hard to see, select the one you want.


You will rarely need to make increases on the WS of the work. You may run across a pattern that specifies increases to be placed every 3 rows or 5 rows. This means some of these increases will be on the WS. For the yarnover buttonholes, the yarnovers are worked on the WS.

If you are working an increase on the purlside but it is not the RS, you need to be more selective. For example, if you are working lifted increases, work the right slanting one on the right side purlwise and a left slanting on the left side. They will appear correctly on the RS.


What triggered this topic was how to work the double yarnovers for the eyelet buttonhole variations.   Since you work the yarnovers on the WS you need to think about how you want them to look.  Most instructions say to knit in the front and then in the back but I think this produces a fairly ugly buttonhole.  I like to work two M1 increases.  My preference is for the appearance of the one at the top left.  The video shows this:  Purlside Increases

KNITTING SALON
Salon will be on Saturday from 1:30-3:20 pm.  Hope you can make it.

CURRENT PROJECTS
I put aside my blue sweater once I had worked the buttonholes.  I did not want to try and figure out what I had done in three month's time.  I started on the twin set.  I have to say, this is the softest yarn I have ever worked with.  It is so luscious.


Friday, September 13, 2013

Eyelet Button--Version 3

Last week ended with a drive to Zanesville for the selection meeting for the Spring issue.  The Fashion Framework lesson is on dog sweaters and the Stitch Anatomy lesson is on lace, particular circular lace (can you tell I am avoiding the "D" word--DOILY).  This is something covered in Level 3 of the Masters.  There won't be any doilies other than those in the lesson in the magazine but there will be lots of dog sweaters, including a lace one.

STUDENT NEWS
Another slow week...I only had two lessons to review and no new students.  I'd like to say that I got lots done but not so much...

Pre-registration is closed for the conference in Charlotte.  I learned in Indianapolis that there were students who wanted to sign up for the Finishing Classes but since they didn't have time to do the homework, they couldn't.  I'm going to put together some homework packets just in case.  I'm always willing to provide the swatches, if I have enough time.  Obviously, I do charge for it.

I'm putting together the kits for the classes now.  I do learn from my mistakes!

TIP OF THE WEEK
This weeks tip is about the third version of Eyelet buttonholes.  Again, there are lots of variations.  I have just selected three.  I've had some suggestions about future topics so I will take a break from finishing tips next week. 

This version of the eyelet looks like a vertical buttonhole.  In the Masters Program we categorize buttonholes as either eyelet, horizontal or vertical.  This doesn't describe how the buttonhole LOOKS but rather how it is made.  If you are doing Level 2 of the Masters Program, don't include this as a vertical buttonhole.

The photograph below shows this type of buttonhole in stockinette and ribbing.  You can use it for other stitch patterns. 


This buttonhole, as with versions 1 and 2, uses double yarn overs. Instead of using the yarn overs to make two stitches, you knit or purl into the yarn over itself. This isn't noticeable in ribbing but it is in stockinette. If you look at the buttonhole itself you can see the strands of yarn.  It is even more visible on the WS of the work as seen in the photograph.   


The only tricky thing about this buttonhole is to stay in pattern.  Depending on the stitch pattern, you either purl or knit INTO the yarn over.  In the instructions below, notice where it says (knit or purl).  The instructions assume you are working it in K1P1 ribbing. 

  1. Work the knit stitch before the stitch where the buttonhole will be placed. (For K1P1 ribbing this should be a purl stitch.
  2. Double YO, K2tog, complete the row.
  3. Next Row: Work in pattern to the yo, knit* the first yo and drop the second, complete row.
  4. Next Row: Work in pattern to the buttonhole, purl* into the buttonhole, drop the purl stitch, complete row.
  5. Next Row: Work in pattern to the buttonhole, knit* into the buttonhole, drop the knit stitch, complete row.
*This applies to K1P1 ribbing. 

Here is the video:  Eyelet Buttonhole--Variation 3
 KNITTING SALON
Salon will be on Sunday from 2-5pm.  Saturday is a busy day.  There is football game, it is Yom Kippur and I have to drive to the airport. 

CURRENT PROJECTS
I already have the yarn for one of the garments I am going to do for the Spring issue.  I am doing a twin set using Lotus Mimi (100% mink).  It is pretty luscious.  Penny wants it sized for her so the color is RED (again).  Good think I like red.  I did the gauge swatch and I am happy to report the fiber responds well to wet blocking.  I haven't started yet as I want to finish up another project.


I have the back and one of the fronts done for this sweater.  I want to finish up this front before starting the next project.  This is a absolutely PLAIN cardigan.  The front band folds over so I have to do buttonholes on the facing as well.  I'm using vertical buttonholes.  I don't mind all the yarn tails as I will use them to reinforce the buttonholes when I'm done.  I am afraid to put this down without finishing it.  Even with notes, I'm not sure I could reconstruct what I am doing.  The buttonholes are exactly 32 rows apart and each buttonhole is 5 rows.  It is easier to finish this up than remember (in 2 months time) what I did.


Thursday, September 5, 2013

Eyelet Buttonhole Version 2

I'm doing my blog a day early as I have to drive up to Zanesville, OH for the selection meeting tomorrow.  We are picking the designs for the Spring issue. 

STUDENT NEWS
I received several lessons on the Saturday before Labor Day.  I felt bad that they couldn't go out until Tuesday.  Several students have let me know that their work is on the way.  Keep me busy!

TIP OF THE WEEK
I thought I'd finish up with the eyelet buttonholes before going on to a different topic.  This week it is Eyelet Buttonholes Version 2.  This buttonhole isn't all that different from the first version but it does require some pre-planning.  It is used for K2P1 stitch patterns.  The buttonhole is worked over the two purl stitches but you have to begin the technique on the last knit stitch before the two purls stitches.  Decreases are worked on either side of the yarnovers.  The first decrease is an SSK.  This decrease slants towards the left.   Since the stitch to be decreased is a purl, the knit stitch covers up the purl.  A K2tog decrease is used on the other side of the yarnovers.  This decrease slants towards the right so the knit stitch covers up the purl.

As for Version 1, this version uses a double decrease as well.  Since the yarnovers are above two purl stitches, they need to be worked in such a way so that they will be purl stitches on the RS when the buttonhole is complete.  The decreases and yarrnovers are made on the RS so the next row is a WS row.  That means if you want these stitches to be purl stitches on the RS, you will use a knit increase.  I use M1 increases.  It really doesn't matter which way you slant them since you are working them on the WS. 

This photograph shows the buttonhole.  I stretched the swatch so you can see the buttonhole more clearly.  When it is not stretched, the buttonhole is almost invisible.  Here is the video:  Eyelet buttonhole Version 2


KNITTING SALON
Salon will be on Sunday from 1:30-3:20.  On Saturday I will be at the UK football game. 

CURRENT PROJECTS
I have finished the Pepe LePew skirt.  The fabric looks quite stiff but it is actually quite soft.  It has a nice drape. 


I'm still using my Zoom Loom to use up sock yarn.  If you visit, you have to take coasters with you.  They are fun.  The ones that are spread out are made from Zauberball sock yarn.  The repeats are so long the resulting coasters are all different.


Friday, August 30, 2013

Eyelet Buttonhole Version 1

I must be living right...  I thought my computer had decided it had had quite enough and refused to turn on.  Of course, I had not backed up my working files for quite some time.  I do have PDF copies of all of my course handouts.  Luckily, it was just a glitch so I spent a few days meticulously doing backups.  I think it is time to upgrade anyway...better to do it when I am not in a crisis mode.

When I started this blog I indicated I would have the obligatory photos of my cats and I have been very neglectful.  Here is George. 


You can't see what he is staring at so intently.  He was looking at Petipa.


She is giving him the evil eye as well.  Her new favorite place to hang out is the basket which a very nice house guest brought filled with farm fresh goodies.  Maybe I should knit her a cushion for it.

STUDENT NEWS
It was a very slow week until yesterday (which was a good thing since I was having computer problems).  I expect that things will pick up after Labor Day.

TIP OF THE WEEK
I decided to do a tip about a variation of the eyelet buttonhole as I had already done a video a while ago for a student.  (Computer Problems, Again.)  This variation produces a larger buttonhole that the standard eyelet and can be used in any stitch pattern.  I show it in stockinette.  In an upcoming tip I will show it in K2P2 ribbing which requires a bit more planning.  (By the way, there are a lot of variations of the eyelet.  I am just going to cover the ones I do in my course.)

Working this buttonhole is easy.  You work up to two stitches before the location for the buttonhole.  You work a K2tog, then a double yarnover, then an SSK.  The tricky part is on the next row.  Generally buttonholes are worked flat.  I can only thing of a couple of instances where you might work them in the round...perhaps a pillow where you wanted a buttonhole closing at the top?  Anyway, since they are worked flat, you generally start them on a RS row.  What you have to do next is worked on a WS row which complicates the process. 

In the standard instructions for this buttonhole, you knit into the first yarnover and then purl into the back (basically a bar increase).  As soon as you knit into the front of the yarnover, it more or less becomes one big yarnover which can cause some confusion.  Remember you are on the WS of the work so when you knit the first yarnover, it is a purl on the RS.  The purl stitch you make on the WS is a knit on the RS.  For some reason, I really don't like the way this looks.  I don't know why this should matter as it is a buttonhole but it does.  What I prefer to do is to work an M1R and M1L (as shown in the photograph). It produces a better looking buttonhole. Is this necessary?  Absolutely not!

One of the students taking my Finishing Course suggested I do a tip of the week about purlside increases.  I've done one on purlside decreases so I will probably do this next week (computer willing!).  These aren't difficult.  Basically you just work the increases as a purl instead of a knit but I will go into more detail when I do the tip. 

Here is the link to the video:  Eyelet Buttonhole--Variation 1


KNITTING SALON
I will be driving to the Cincinnati airport tomorrow so Salon will be on Sunday from 2-5.  Football and the opera are resuming soon so most likely Salon will be on Sundays. 

CURRENT PROJECTS
I am making progress on my Pepe Le Pew skirt.  I'd like to have it done in time to wear at the meeting in Charlotte.  That shouldn't be a problem.  Nothing makes you want to go on a diet more than knitting a skirt from side-to-side!


I put together my proposals for the Spring issue of Cast On.  The selection meeting is next Friday. 


Friday, August 23, 2013

Eyelet Buttonholes in K1P1 Ribbing

It was a very nice SLOW summer week.  I was able to catch up on everything that piled up while I was out of town. 

STUDENT NEWS
I received only one lesson for review but from the emails I have been getting I suspect more are on the way.  Don't be shy about asking me to do a video for you if there is something you are having trouble with.  I can always do one on pretty short notice.  They tend to be a little too long to send via email so I have to post them on Youtube but if you have a problem with something, no doubt someone else will as well.


TIP OF THE WEEK
This week's tip is about simple yarnover buttonholes in ribbing.  I thought I was finished with seaming but I figured out this morning I had skipped over seaming a horizontal (bound off) edge to a vertical (selvedge) edge.  I'll do that next week.

When you are deciding what type of buttonhole to work there are several factors to consider.  It first has to be the right size to fit the button.  Some types of buttonholes, like a simple eyelet, do not produce a very large hole.  It also has to work with the stitch pattern.  For example, you can work an eyelet buttonhole in garter and seed stitch but they can be a bit hard to see (and find).


The good news is that they are very easy to make in most stitch patterns.  Just YO, K2tog or K2tog, YO.  It really doesn't make that much of a difference.  The problem comes when you work this type of buttonhole in K1P1 ribbing.  If you don't place the yarn over properly, the buttonhole can look really ugly.  As always with anything in knitting, the goal is that the stitch pattern is not interrupted.  It will look better if you place the yarnover over a purl stitch and then use the correct decrease.  If you look closely at the buttonhole below, you can see that there is a purl bump at the base.  When you work any type of single decrease, one stitch will be on top of the other.  K2tog decreases place the second stitch on top of the first.  In this case, the second stitch is a purl stitch.  SSK decreases place the first stitch on top.  For this particular buttonhole, an SSK decrease would have worked better or the yarnover could have been worked first, the the K2tog. 


This photograph shows some eyelet buttonholes worked in K1P1 ribbing.  Notice that the pattern has been maintained.  The columns of knit stitches are continuous.  If I had worked the wrong decrease, this would not be the case.  Can you tell what type of decreases I used for each?  Probably not unless you look very closely.


I've stretched the swatch and labelled each type.  It really doesn't matter which you use.  The important thing is to select the decrease which will cover the purl stitch. 


The video shows how to make each.  Eyelet buttonholes in K1P1 ribbing

KNITTING SALON
Salon will be on Sunday this week as I have to drive up to the Cincinnati airport on Saturday. 

CURRENT PROJECTS
I got the photograph from the photo shoot last week of my coat.  I think it turned out very nicely.  I hope they use it in the magazine. 


At TNNA, Schact Spindle Company had distributed their new product, Zoom Loom to all of the yarn companies.  Most put some of their yarn on the looms which was very intriguing.  They sent one to Penny to be reviewed and I took it home with me to try out.  I have had so much fun using up leftover sock yarn.  I have no idea what I am going to do with all of these squares.  They are the perfect size for coasters.  Since my surgery I like to vary what I do with my hands.   I've had so much fun I bought a Cricket Loom last weekend.  I managed to warp it with no problems but I am such a perfectionist I can see that what will drive me crazy is developing a consistent looking fabric.  The yarn they sent with the loom really shows you how inconsistent you are...bright red and blue.  I am having fun with it.


I have had time to work on my skirt.  I'd love to finish it in time to wear to the meeting in Charlotte.  We shall see.  I do like it but I am not wild about the white stripes.  I think it has a "Pepe La Pew" feel to it (for those of you who love Looney Tunes like me).  The skirt will be so full that I think the drape will mitigate this so I will continue on.