Friday, June 27, 2014

Intarsia Part 1

I have finished up all of the yarn balls for the Yarn Tasting.  It is a relief!  The participants are really getting a good deal.  I've even worked up swatches for all of the samples and tagged them.  I now have some new favorite yarns.


STUDENT NEWS
It must be summer...I've received very few lessons this week.  So far it is working out just fine emailing the letters and the next lessons. Postage has really gone up.  I would hate to raise the price of the courses.


TIP OF THE WEEK
The tip for this week is about intarsia knitting.  Most knitters can be divided into two categories...process knitters or product knitters.  Some knitters just enjoy the process of knitting and don't care all that much about the final product.  Others knit to create a finished product.  If you are working on an intarsia project, I hope you are a product knitter as the process isn't all that much fun.  First of all, you will be knitting flat which many knitters don't like.  The majority of intarsia projects are just stockinette, no fun stitches.  And then there is yarn management.  I have done lots of intarsia knitting in my time and I can't honestly say I enjoy it but the results can be fun.  

Unlike stranded designs where two yarns are carried across the row, intarsia designs are blocks of color.   The photo below shows a classic intarsia design, an argyle.  


What I do first when I am considering an intarsia design is to study the chart to see if it is worth the hassle.  Since traditionally, you do not strand over stitches, you need a separate ball of yarn for each color.  The photo below shows a very simple graphic design.  I've numbered the balls of yarn required to work this design.   For this simple 22 stitch design, I would need to have 6 balls of yarn.  


You could strand this design but it would change its texture and like any strand, it might snag. (If you are doing the Masters Program, don't strand.  You can strand over the crosshatching lines in an argyle but that is pretty much it.)    

This photo shows the back of the design with the yarntails woven in using the duplicate stitch method.  If you hate weaving in yarntails, avoid intarsia designs.


Yarn management is the biggest issue with intarsia knitting.  I've tried every bobbin made and every suggestion and I've found my little center-pull balls the best way for me.  Many knitters find using just long strands of yarn the easiest but the video I did for this technique demonstrates why this doesn't work for me.  (A big black cat named George.)

The second biggest problem is holes where the two colors join.  You can avoid this by always following the rule, bring the new color under and to the right of the old color.

When you join a new yarn just drop the old color and start using the new color taking care to leave a tail long enough to weave in.  When you add a new color, if you leave this tail on the RS (as shown in this photograph) you won't mistakenly use the tail instead of the working yarn on the next row.  When I teach intarsia, this happens at least to half of the students.  I wish I'd thought of this but I found it in Margaret Radcliffe's book Essential Guide to Colorwork Techniques.


Here is the back of the work.  You can see where the stitches are interlocked since I always went under and to the right when changing colors.


I've found doing diagonal designs much more satisfying.  The tension in the stitches is much easier to control. Vertical designs can be a problem.  Next week I will do a video on vertical designs and how to work with the tension.  Here is the video for this week:  Intarsia Part 1


KNITTING SALON
Salon will be on Saturday from 1:30 - 3:20.  


CURRENT PROJECTS
I've started on my projects for Cast On.  I am making a pair of over-the-knee socks with The Unique Sheep's gradiance yarns.  Since the color changes are the focus I've chosen a simple eyelet pattern.  I think these will be fun.    


Friday, June 20, 2014

Winding Yarn into Center-Pull Balls

I can see the light at the end of the tunnel.  The last box of yarn for the Tasting should arrive today from Fiber Optics.  I am hoping to get all of the yarn balls and yarn for the goody bags shipped off early next week.  I can't complain too much since I volunteered to do this and I never expected such a good response.  All I can say is there are going to be 80 very happy knitters at our show.  This pretty much sums up what I have been doing.


I have to get all of this yarn out of the house as I am starting to get the yarn for the Winter issue of Cast On.  RedFish has sent yarn for the mitten garland and the yarn from Unique Sheep (over the knee socks) should arrive today.

STUDENT NEWS
It was a fairly slow week.  I did have a student complete the Basics course and she is going on to the Masters Program.  Another finished up the Finishing Course.  It makes me happy when I have students complete courses.


TIP OF THE WEEK
I've had several people ask me how I make those center pull balls and I thought since I am still winding tons of them this would be a good week to do it.  Laura Farson, who has taught at our conferences, showed me how to do this.  I was going to list Laura's books here but it is easier to just put in a link to her books on Amazon.  Laura's books.  I thought you had to use a nostepinne to make these balls but Laura showed me how using a large Sharpie.  Most nostepinnes are too large for these small balls.  The one I have is also very decorative and not as practical as a Size 17 DPN.


The video I made demonstrates how to make these center-pull balls.  I prefer center-pull balls for most of my work anyway.  I have done a fair amount of intarsia work and these balls have solved the problem of yarn management.  I find these work better than any yarn bobbin I have tried.  I searched through my photographs trying to find a photo of those argyle vests I did in progress but I did a purge recently.  Winding Center-Pull Balls


KNITTING SALON
Salon will be on Saturday from 2-4pm. I'll be getting up at the crack of dawn to drive to Cincinnati airport so I may fall asleep.  I'm going to Grand Night for Singing Sunday afternoon.


CURRENT PROJECTS
I have had no time for knitting, thanks to all of this yarn.  I did make some progress earlier this week on the Wasp Wing dress.  Since yarn is arriving for Cast On projects, this will have to wait.


Friday, June 13, 2014

Lifelines

This has been an incredibly hectic week.  We had the selection meeting for the Winter issue of Cast On.  The stitch pattern focus is on brioche and the fashion framework is for cowls.  The issue will be accessory heavy as it is the holiday issue...lots of ideas for gifts.  I hauled up all of the yarn I have put into center-pull balls and the yarn for the goody bags.  This photo is just the tip of the iceberg.  My car was stuffed.  The sponsors for the yarn tasting are providing AT LEAST 20 skeins which will be distributed among the bags but Anzula and Baah sent 80, one for each participant.  I envision sort of a Halloween Candy Exchange after the tasting.


I indicated in a post on Ravelry that I would provide a complete list of the sponsors but that would take too much time.  Instead I took two photographs of the swatches I have worked up and tagged.  These are the yarns that are finished....I still have four yarns from Blue Moon, three from LB Collection, Swan Island, Imperial Yarn, Brown Sheep, Araucania, and Elemental Affects to "process".  There are still a few companies who want to be sponsors but haven't sent the yarn yet.  There are three weights:  lace/sock, DK and worsted.  As of this minute there are 32 yarns.


On Tuesday we had the photo shoot for the Fall issue at an alpaca farm.  It was a lovely location.  After a late start it went quite well.  We had a baby and his big brother model the argyle vests I did a million years ago.  They were absolutely adorable.  I changed what I plan to do for winter so we can use them again.

STUDENT NEWS
It seemed like I reviewed a ton of lessons this week but that is probably because I was out of town.  Keep up the good work!


TIP OF THE WEEK
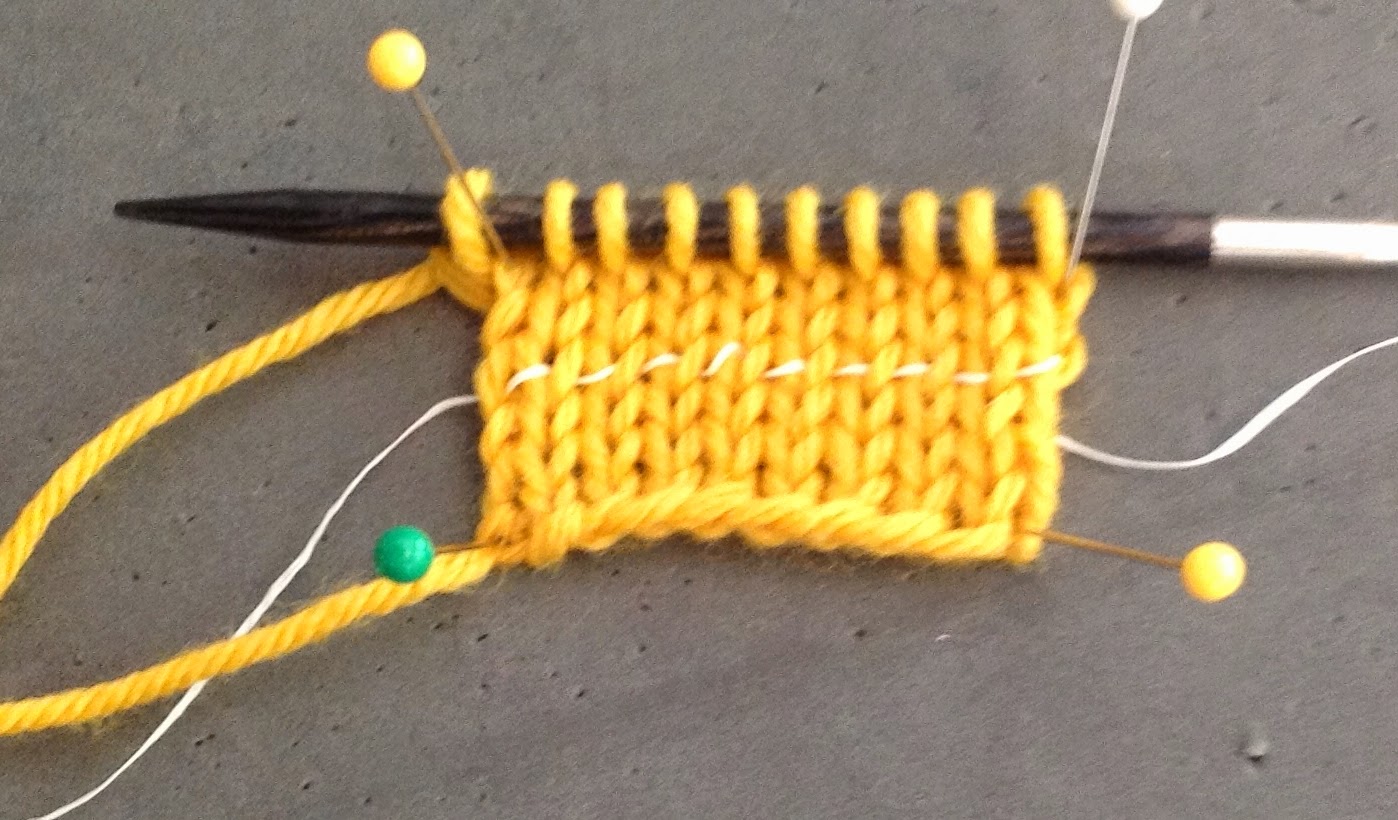
This is a companion piece to last week's topic.  Anyone who has had to rip out work knows what a pain it can be but it is particularly difficult with lace.  Those yarnovers and decreases can be hard to see.  If it is a complicated lace pattern, it can be difficult to figure out what row you are.  (The same can be true for cable patterns.)  Lifelines are the answer.  I don't know who first came up with this idea but we all owe her/him a big thank you.  The basic principle is that you thread up a needle and run some waste yarn or some other type of thread through the live stitches on a needle.  You then knit the next row taking care that you don't knit the waste yarn.  It looks like the photo below:


You don't want to use project yarn or other bulky fibers as it will distort the tension of those stitches.  I use dental floss as it is thin and the waxiness makes it easy to pull free.  In the video I show how to use a needle to place the lifeline and another technique.  If you have interchangeable needles that use a key to tighten them (like KnitPicks, Chiaoo Goo or Knitters Pride) you can run the thread through the tightening hole and the life line is added as you knit.  (My demonstration of this is poor as I was only working with ten stitches.  It works much better for longer pieces.)

If you have to rip out work, you rip out to the lifeline and your stitches are saved, no laddering down.  You just put the stitches back on the needle.  (See last week's blog entry about how to do this.)


Lifelines can also serve as row markers. I was working on a complicated lace pattern that had a 24 row repeat.  It was very easy to lose your place.  I started putting in life lines every 10 rows.  I found this very useful.  Lifelines


KNITTING SALON
Salon will be on Sunday from 1:30-3:20 pm.  


CURRENT PROJECTS
I finished up the front (or back) of my Wasp Wing dress but as soon as yarn starts arriving for the garments I have signed on to do I will have to put it aside.  I was hoping to finish it before the conference at the end of July but I don't think that will happen.  It will look SO different when it is blocked.  It is the same as the tunic I did for the fall issue but longer.


Friday, June 6, 2014

"Unknitting"


I had a lovely week out west.  I took the photo above along the Colorado River outside Moab where we had a picnic.  It was nice vising my old haunts.  I came home to BOXES and BOXES of yarn for the Yarn Tasting.  Some of the sponsors have been incredibly generous sending not only 4 or 5 different yarns to taste but absolutely fabulous yarns for the goody bags.  Anzula sent 80 skeins...enough for every participants.  It does take quite a bit of time to get the yarns ready.  I am particularly enjoying knitting up the swatches.  It has been very informative.  Some of the designs I have proposed for the winter issue will use yarn I have "tasted."  Here are a few of them blocking.  I have four more soaking right now.


STUDENT NEWS
Only one lesson arrived while I was out of town but several arrived during the past week.  All of the work has been just lovely.  Thank you for all of your hard work!


TIP OF THE WEEK
This topic is a special request.  I have a new student who wanted to know how to back up to fix mistakes or how to take out work completely.  If you notice a mistake only a few stitches away it is easy to "unknit".  Just insert the left needle into the stitch below the one you just knit slip it to the left needle and pull the working yarn out.  Continue to do this until you reach the stitch you need to fix.  

When you "unknit" you avoid one of the pitfall of ripping work out.  It is easy to change the mount of the stitch on the needle and unless you are paying attention, the resulting stitch might become twisted.  When you rip work out, you remove the needle and pull on the working yarn until you reach the location you need to fix.  I always put a safety pin at the location first so I don't get carried away.


This works fine with yarns that have some "memory," like worsted wool.  You just put the stitches back on the needle.  When you do this, try to put the stitches back on through the back.  It will make things easier.  It isn't the end of the world if you can't.  The goal is first to get the stitches back on the needle without splitting the yarn.  If you rip out stitches worked in fibers like bamboo, the stitches sometimes collapse.   Lifelines (which I will discuss next week) are the answer for those types of fibers.

Many times the stitches will not be mounted properly on the needle.  This photo shows three stitches which are not properly mounted.  


If you were to knit or purl these stitches through the front, you will twist the stitches.  You can see in the photograph below that twisted stitches stand out.


The video shows how to unknit and how to deal with stitches not properly mounted.  Unknitting

KNITTING SALON
Salon will be on Saturday from 2-4pm.  It will take some effort on my part to clear a path to the dining room!  I am not kidding when I say I have boxes of yarn everywhere.


CURRENT PROJECTS
I finished up the last of the socks as this rather impressionistic photograph suggests.  I really like this stitch pattern.  


I started on my wasp wing tunic.  It will be wider at the bottom and longer than the one I did for Cast On.  The yarn is the Shibui Linen and is actually gray in color.  It looks tan here.