Friday, October 26, 2012

 
Every morning this week after my walk to Starbucks, I've walked over to this street and photographed the ginkgo trees.  This is the prettiest street in Lexington this time of year.  Expect an update next week although rain is forecast which could bring down all of the leaves.  The ginkgo trees remind me of aspen.
 
Besides taking pictures of ginkgo trees, I spent the week finishing up my obligations for the spring issue of Cast On.  I wrote the pattern for the shawl, knit the socks, wrote the pattern for the socks, wrote the third article in the finishing series, knit samples for the Fashion Framework article on skirts and started the second pair of socks.  I'm hoping to finish up the Fashion Framework article today.  I will be completely ready for the photo shoot which isn't for a couple of weeks!  What will I do with all that time...November birthdays are coming up not to mention my holiday knitting!
 
STUDENT NEWS
It was a slow week.  Again, it is like my students can see my calendar!  The response to my gauge class has been pretty good, considering the topic which isn't exactly exciting.  Important, yes.  Exciting, no.
 
TIP OF THE WEEK
The tip this week was a special request (yes, I do take requests) from one of the Co-chairs of the Masters Committee--how to begin a vertical seam.  The focus of Level 2 is finishing.  This is probably the toughest level for most knitters since most knitters hate finishing.  The ironic thing about finishing is that if you know how to do it, it isn't all that bad.  Sometimes I compare finishing to baking a cake.  Yes, you can be a terrific baker.  Your cakes may taste great but if they are lopsided and ugly it detracts from the cake.  Finishing is like frosting the cake.  It can make it exceptional. 
 
When you begin a vertical seam (think bottom of sweaters and sleeve cuffs) it is important that both sides line up exactly at the bottom. It looks sloppy when they don't.  The photograph shows an example of a poorly started seam.   Several of the required swatches in Level 2 address vertical seams.  One of the things the reviewer look for is if the pieces line up.


The "Figure 8" technique is the recommended method for starting a seam since it avoids this issue.  Compare the photograph above to this one:
 
 
This technique isn't hard.  The steps are:
 
  • Align the pieces RS facing, side-by-side, with the cast on edges at the bottom. Insert the needle from back to front through the cast on edge of the piece on the right.
  • Insert the needle from the back to the front of the cast on edge of the piece on the left.
  • Complete the Figure 8 by inserting the needle from back to front into the same spot on the cast on edge.  If you manipulate the yarn you can see that it forms a Figure 8.


When this is pulled tight, it anchors the two sides together and it is invisible.  I think the mistake many make is that they don't begin in the cast on edge.  By the way, when I say "cast on edge"  I mean the strand of yarn.  Don't split the yarn.

Here is the link to the video:  Figure 8

KNITTING SALON
There isn't a salon this week as I will be at the simulcast of the Met's production of Otello.  This is the last week of the finishing class I am teaching at home. 

CURRENT PROJECTS
I have blocked the shawl and woven in the yarn tails.  The pattern is really lovely.


The drape is fabulous.  This linen is softer than other linen I have worked with.  I've posted more photos in my projects page in Ravelry.  Circles Within Circles Shawl

I finished the socks as well.  I decided to call them Thalassa Socks.  (What is the point of a degree in Classical Greek if you can't use it?)  Thalassa is the word for sea.  I think this design has a very Aegean feel to it.  Sorry, Isabel, I can't call them the Green Wave!


As I was knitting these, I realized that the color scheme I chose would require buying two packs of the yarn so I am going to knit up another pair with an alternate scheme which will use just one.  Now that I have finished the samples of skirts for the skirt article I can do the socks.  I decided to work up three skirts (gathered, straight and A-line) as illustrations.  They would fit an 18" doll.  They are blocking now so I will photograph them next week.

I was going to do ribbing at the top but it wouldn't match the drape of the rest of the socks so I did a foldover hem.  I grafted the hem using the same technique I used for the skirts.  It really works well.  The top is as stretchy as the rest of the sock.

I got a nice surprise in the mail on Wednesday. Elf and Sandy sent the yarn for the final sweater in the Utah series.  I spent quite a bit of time with Elf in Reno selecting colors.  She also sent some extra blues (not photographed) for me to play with.  Swatching will commence soon.  You really have to see the actual thing before you make final decisions.  I am NOT looking forward to winding all of this into balls!


I think this will be a beautiful sweater.  I'll post photos of the swatches as I do them.
 

Friday, October 19, 2012

A pretty dull week, not that I am complaining.  I got a lot done, not as much as I had hoped, of course.  I still have tons to do before the next photo shoot which is approaching faster than I had hoped.  I started the Fashion Framework article on skirts and decided it needed samples so I routed around through my stash to find yarn to do sample doll skirts.  After the socks, those come next.

STUDENT NEWS
Very few lessons arrived this week.  Ladies (and Gentlemen) please keep me busy!  I like to review at least as many lessons as new students.  This week I had far more new students than I had lessons to review.
 

As I've mentioned before I send links to my DropBox where I store the course materials.  It takes much less time to send the links.  Sometimes there are problems with this, depending on the service you use.  If you don't get it, check your SPAM folder first.  I can also send PDF files or mail you the materials if there is a problem.

TIP OF THE WEEK
The topic for this week was again inspired by the finishing class I am teaching.  Periodically when I get a lesson from a new student, I find that they have used a selvedge treatment on their swatches in an attempt to make them more attractive.  First, let me make it very clear, ALL SELVEDGES ARE UGLY.  That is their nature.  I wouldn't waste a minute of my time trying to make them pretty. (Tension issues are a different matter.  If they are ugly because they are oversized and loopy, this is something you need to fix.) 

I want to see the selvedge stitches which means you should work them in pattern.  This lets me see if there is a tension problem.  Selvedge treatments generally obscure any tension issues.

What do I mean by selevedge treatment?  The most common one is to slip the first stitch of every row.  This produces a chain on the side.  The photograph shows two swatches.  One where the first stitch has been worked, the other where it is slipped. 


When would you want to use a selvedge treatment?  Don't ever use this for an edge which will be seamed or used to pick up stitches.  As you can see in the photograph, the slipped stitches span two rows.  This does not provide a sturdy edge for either a seam or band. 

The time to use a selvedge treatment is if the edge is not going to be finished.  It does provide an attractive edge.  I used selvedge treatments on two of my latest projects, the bottom edge on the side-to-side garter skirt and the shawl which has a garter border.   I find this a better looking edge for a garter project.  


When you slip the stitch in garter stitch, you have to slip it purlwise and bring the yarn to the back in front of the slipped stitch.  The video show techniques for both stockinette stitch and garter.  Here is the link to the video:  Selvedge Treatments

KNITTING SALON
There won't be a salon again this week.  I will be teaching the third session of the finishing class on Sunday.  I am going to use my Saturday to write the pattern for the shawl.  Next week is another opera so I won't be hosting a salon until November.

CURRENT PROJECTS
I don't know what it is about my work ethic but if you give me two weeks to do something, it is going to take me two weeks to do it.  I thought I'd have the shawl completely finished and blocked by mid-week but it took much longer than I thought.  I kept making stupid mistakes which required ripping it out.  It is a fairly complicated lace pattern but it got ridiculous.  I finally finished it this morning. 


It actually doesn't look too bad even though it isn't blocked.  Here is how it looks now:


One of the great things about linen is how quickly it absorbs water.  It was completely wet within 10 minutes.  As soon as I finish this blog, I am going to block it.  It should be around 80" long so this will take some time.  I'll photograph it as it blocks.  The other great thing about linen is how quickly it dries.  It is a sunny day here and I generally drag things to my deck to dry.

Friday, October 12, 2012

I put the final touches on the Understanding Gauge course this week.  I am very happy with the materials.  The focus is using gauge rather than how to measure gauge, although that, of course, is covered as well.   I want the course to be useful to anyone who has already taken the Basics class without two much repetition.  It will take a lot of the mystery out of the "nuts and bolts" aspect of the design process.  You can't teach creativity but you can explain the process.  This course would benefit those who don't have much design experience who want to do Level 3. 

STUDENT NEWS
My students are so considerate.  Somehow they know when I am busy writing and they don't send in their lessons.  Of course, the beautiful fall weather could have something to do with it as well.

The first part of the finishing class went very well (at least I thought so but I guess you'd have to talk to the students!)  It is very nice teaching at home.  If I forget something or someone needs needles or some such thing, it is easy to get it.  The hardest part was putting in the extra leaf in the dining room table!

TIP OF THE WEEK
The difference between the smooth and bumpy edges came up in the Finishing Class.  I thought it would make a good topic for a tip as well, along with how to read your work.

The long tail cast on is probably the most commonly used cast on technique.  Most knitters just cast on and then follow a pattern but an understanding of this cast on can help you avoid potential problems in your work.  The long tail cast on produces the first row of stitches as well as the cast on edge.  Unless you are using some other version (and there are many!) this first row produces the smooth edges which is a match to knit stitches.  For most projects the stockinette side is the RS or public side of the work.   When you turn the work for the first row, the bumpy side (purl stitches) is presented.  If you work this row as the first RS or public side, you have selected the bumpy side of the cast on as your RS. 

The photograph shows the smooth and bumpy sides of these small swatches.  How big a deal is this?  It isn't important at all as long as you are consistent.  For example, if you have the smooth side as the RS on one sleeve and the bumpy side on the other sleeve, it isn't symmetrical. 

It is a matter of personal opinion as to which you prefer.  The next time you use a pattern, see how the designer handles this.  If the first row of the pattern is designated as a WS row, you know they have elected to have the smooth side as the RS.  If they have the first row after the cast on as a RS row, then it is up to you to change this, if you want the smooth side as the RS.


Quite a few projects begin with ribbing which is one reason designers don't specify one way or the other.  This photograph shows ribbing.   You might want to look at it and see which your prefer.  Generally speaking, if there are any knit stitches, the smooth side is preferred since the purl stitches recede into the background but again, it really is up to the knitter.  Just pay attention to see which side you are choosing so that you are consistent.   The video for this week shows how you can determine which is the right side.  Smooth vs Bumpy Video


Reading Your Work
If you are doing the Masters Program or taking any TKGA classes, you know that you have to tag your work.  Tags are always placed in the upper left hand corner of the swatch.  (The arrows mark this spot in the photograph.) This is the industry standard.  This lets the person looking at the swatch know which is the RS and tell the top from the bottom.  In the Masters Program, this lets the reviewer know that the knitter can tell the difference between the cast on edge and bind off edge.  The nature of the knit stitch and the purl stitch is that they look the same upside down. 

If you are seaming something it is important that you start from the cast on edge and work to the bind off edge.  Otherwise the stitch orientation is upside down and you will either use a half stitch or a stitch and a half for the seam.  In most projects this isn't a big deal as the shaping tells you what is the top and what is the bottom.  For something square or rectangular, it can be a problem.

If you don't know what the bind off edge looks like (as I've said, lots of knitters never look at their work), pay attention the next time you bind off and you will notice that the bind off edge is interlocking loops.  (That assumes you are using the standard bind off.)  The bind off edge does not look like the cast on edges, smooth or bumpy.  By the way there are very many different ways to cast on and in some cases you can match the cast on and bind off edges if you are knitting something like a scarf.

KNITTING SALON
There will not be a knitting salon this week (or probably for the rest of the month.  I've got some deadlines I need to make and between that and the opera schedule and teaching on Sundays, it may not happen.  I'll decide each week.  

CURRENT PROJECTS
I have been yammering on both here and in Ravelry about the importance of looking at your work.  You think I would take my own advice.  I was looking at the shawl I am working on (and I was at least half way done) when I noticed a GLARING ERROR about half way down.  I wish I could just say, "Oh, well" and then make a note for the photo shoot to hide the error but I simply cannot do that.  I ripped it back to the error so I am pretty much where I was last week.  Hence, no updated photo.  This particular lace pattern requires that you pay attention.  I'm hoping to finish it up this week.  I now am looking at it very closely every 12 rows. 

The yarn for the final project I am doing for the Spring issue of Cast On arrived.  I saw this yarn at TNNA and thought it looked fun.  I am doing the wave socks I did for Babel but in these colors.  They package the colors separately which makes them ideal for fair isle or intarsia.  There was some confusion over what yarn I wanted and the lovely people at Blue Ridge have been very generous sending me yarn.  I am sending the extra to Penny Sitler (the editor) and she is going to give it away on the TKGA Facebook page. 


Friday, October 5, 2012

I spent time putting together the Understanding Gauge correspondence course.  It will be more comprehensive than the course I could offer at conferences since the students have more time.  The first lesson will be about how to knit gauge swatches and calculate gauge (also covered in the Basics course) but it will it include how to use gauge information when working with patterns.   The gauge information in the Basics Class is designed to help prepare students for the Masters program.  The gauge course is more about using gauge in actual projects.  Lesson 2 covers how to use gauge information to alter patterns (use a different weight of yarn, change necklines, etc.)  Lesson 3 will cover how to use gauge to design garments.  I am having a lot of fun putting this together.  The course will be available on October 15th.

STUDENT NEWS
Things are back to normal.  I received quite a few lessons to review.  Generally more Lesson 1 swatches arrive.  This week most were Lesson 2.  It makes me happy to see students progressing through the course.

TIP OF THE WEEK
A question that comes up when students do the extra credit pattern in Lesson 3 or in Level 1 of the Masters program is about the difference in Multiples and Repeats in patterns.  Part of the problem is the terminology.  If you have knit for more than one week you know that there is very little consistency with knitting terminology.  I am going to use the terminology we use in the Masters Program.  I did do a video for this tip:  Video

Multiples
If you look at stitch dictionaries like Barbara Walker's Treasury of Knitting series, you will see the information like the following included with the row instructions for each stitch pattern:

Multiple of 4
Multiple of 6 plus 2
Multiple of 24 plus 3

The "Multiple" is the number of stitches it takes to complete the pattern once.  The "Plus" number of stitches is the number of stitches you need to balance or complete the pattern if you are working it flat.  In the example below,  three multiples of the stitch pattern have been worked.  Each multiple is made up of 6 stitches,  4 stitches for the cable and 2 stitches for the reverse stockinette between the cables.  To balance and complete the pattern on the left side of the swatch there are 2 additional stitches for the reverse stockinette stitches.   


If I were going to use this stitch pattern in a swatch knitted flat and I needed to determine how many stitches to cast on, I would multiply the number of cables I want (3) by the multiple number (6). This gives me 18 stitches. I then would add the "Plus 2" which gives me 20. If I wanted a border (as shown in the photograph) I would then add those stitches.

The "Plus" stitch in this stitch pattern would be ignored if you were working this pattern in the round.  If you included the "Plus 2"  There would be 4 reverse stockinette stitches between the first and last cables. 

In the photograph which follows , the lace pattern is a multiple of 8 plus 1.  Each 7 stitch lace motif is separated by a single reverse stockinette stitch.  If I were casting on stitches for this swatch I would need 24 (8 stitches multiplied by 3 (the number of lace motifs I want).  I would then add the "Plus 1" for a total of 25.  If I wanted the border, I would need 6 more stitches.


Repeats
In the Masters Program we use "Repeats" to indicate the the number of times you work the rows of a stitch pattern.  I think the confusion comes from the word itself.  As a noun, it identifies a specific thing.  As a verb it can be used in a variety of ways.  For example, "I am going to repeat the multiple 3 times." 

Here is an example of what you might find in a stitch dictionary for the first swatch:

Simple Cable

Multiple of 6 plus 2

Row 1 & 3: *P2, k4; rep from * to last 2 sts, p2.

Row 2 and all even rows: *K2, p4; rep from * to last 2 sts.

Row 5: *P2, C4F; rep from * to last 2 sts, p2.

Row 6: *K2, p4; rep from * to last 2 sts

Repeat Rows 1-6.

This pattern has a Repeat of 6 rows.  If I were writing a pattern for this swatch I would tell the knitter to repeat Rows 1-6 four times. 

You may want to think of the Multiples as giving you HORIZONTAL information and Repeat as giving you VERTICAL information. 

Some stitch dictionaries provide only charts.  For this chart the "Multiples" are shown as separate from the "Plus 2" by dark lines. 


In patterns for garments the designers have figured out the multiple and repeat information for you but it is usually provided, either in preliminary information or in chart format.  Each publication and individual designers present this information in different formats which contributes to the confusion. 

The examples used above are very simple ones.  It is fairly easy to use stitch patterns of this type in patterns or to translate to chart format.  Not all stitch patterns you find will be so easy.  The project I am working on is an example of that type.

KNITTING SALON
Salon will be on Saturday even though there is a football game.  Since I am teaching the finishing course on Sunday, I had no choice.  Sorry Sports Fans!

CURRENT PROJECT
I've been working on the linen stole for the Spring Issue of Cast On.  I fell in love with this yarn at TNNA.  It is Shibui/linen.  I wasn't sure what size needle to use so I did a gauge swatch.  Notice I practice what I preach. 


The top swatch was worked on Size 5 needles and the bottom one on Size 4.  I liked the larger size better.  One thing I like about this lace pattern is that it is reversible which makes it ideal for the stole.  I've used this stitch pattern before.  It is from one of Barbara Walker's books.  I've made slight modifications to it.  It is an excellent example of a more complicated stitch pattern.  The REPEAT is 24 rows.  The MULTIPLE is 12 but the Plus is the problem.  Technically, it is 3.  Usually the Plus is added at the end but in this case, 2 of the stitches are worked BEFORE the multiple.  Due to the way the increases and decreases at the beginning and end of the pattern are worked, you actually have to work the last two stitches of the pattern differently.  Writing patterns for stitch patterns of this type are always challenging.  I've worked up a preliminary chart using Walker's as a guide but it needs some editing to make it easier for another knitter to use.


Here is the stole so far.  It will look better when blocked.


Friday, September 28, 2012

Traveling is a lot of fun but it is so nice to be home.  I am almost caught up with the stuff that piled up while I was gone. 

I enjoyed the meeting very much.  I had great students and it was wonderful having so many Master Committee members present.  There were 10 committee members present.  (By the way, I got every one's permission to include this photo.  They are great sports!)  From left to right...Martha, Suzanne, Charles, Celia, Leslie, Binka, Sue, Mary, Christina and Sharon.  These are some of the folks who review the Masters submissions.


This photo shows my favorite view...Starbucks to the right, the casino to the left.  I had fairly good luck at the casino as did Charles.  I didn't knit as much as I normally do at conferences!


STUDENT NEWS
I got lots of orders for the Basics class while I was gone.  My iPad makes it easy to keep up.  I used to have to drag a laptop.  I didn't have that many lessons to review when I got home but I managed to get them in the mail the next day.  I am home now and waiting and ready for lessons!

I got news a few days ago that my Gauge correspondence course has been approved.  I need to work on the materials a bit to transform it to a correspondence course but it should be ready to go by the end of next week.  I am quite excited about this.  For many years I didn't bother with gauge but once I started designing I had to suck it up and spend time working out the kinks.  I am like a reformed smoker...I want everyone to understand how gauge works.  The course will cover how to work gauge swatches and how to accurately calculate gauge.  It will include how to use the gauge information when using patterns, modifying patterns and designing your own garments. 

TIP OF THE WEEK
My tip this week was partially inspired by the conference.  Sometimes the yarn that the students bring to class really causes a problem.  I generally specify in course descriptions that the students bring light colored worsted weigh wool and I am amazed how how this can be interpreted.  I've decided that for some of my classes I am going to prepare yarn kits for the students.  It is very difficult to learn a new technique with novelty yarns.  Part of being an accomplished knitter is the ability to select appropriate yarns for projects.  For classes you have to select a yarn that lets you see your work.  Fuzzy, nubby, heathered, tweedy, and dark yarns do not let you (or your instructor) see your work. 


The swatches in this photograph show the types of yarns that students have brought to class.  Can you tell the stitch patterns in Swatches 1 and 4?  Absolutely not.  (By the way, it is garter stitch.)  Yarns like these have their place but not when you are trying a new technique.  You can see the stitches in Swatch 2 but it is next to impossible to rip out the stitches  which you sometimes have to do in class.  I've included Swatch 3 to demonstrate what heathered and tweedy yarn looks like.  A yarn is heathered when 2 or more strands of different colors are plied together.  Tweedy yarn has nubs of different colors in the strands.  Heathered yarn is great for projects because it hides problems.  This makes it a poor choice for classes.  If you can't see problems, you can't fix them.


Here are some swatches I've used for examples.  This is simple worsted weight wool.  You can clearly see each stitch.  Even if you never use worsted weight wool for projects, it is excellent for the class environment.  Once you learn the technique on yarn like this, you can translate that skill to projects worked in different yarns.

When I decided to do this topic, I asked the co-chairs of the Masters Committee if they had anything they'd like me to say about the yarns to use for the Masters Program.

Yarn for Masters (and Basic Class) Swatches
The first question you have to ask is if the yarn can be blocked.  This will rule out quite a few yarns.  It is very difficult to block acrylic yarns.   It either doesn't work at all or the swatches look limp and melted.  It is a problem for some superwash wools as well. The yarn that gives the best results are 100% worsted weight yarns like Patons Pure Wool, Lion Brand Fisherman Wool, Cascade 220, etc.  Sometimes knitters who live in warm climates or have wool sensitivities ask if they can use alternate fibers.  Yes, you can but the swatches have to be adequately blocked.  If the fiber can't be blocked, don't use it.  It may take some experimentation to find an appropriate yarn.  Remember, may fibers, like cotton, can contribute to tension issues.

Color is another issue for the Masters Swatches.  Don't use dark yarns.  The reviewers (and you) can't see the stitches.  Color is subjective but it is safer to stitch to pale colors.  Heathered yarn should never be used.  The reviewer will not be able to evaluate your tension. 

Yarn for Masters Projects
Several projects are required for the Masters programs.  The first question to ask is if it is an appropriate weight.  Chunky or Heavy yarn should NOT be used for any project.  Yes, it is quicker to knit a vest in chunky yarn but it doesn't allow you to show off your skills.  Yes, you can knit a fair isle hat in worsted weight yarn but part of the equation is selecting the weight of yarn traditionally used for such projects.  You will not be able to get the same complexity of design.

Color is another issue.  Many knitters raid their stash for yarn for the projects.  Color choices are evaluated as well for the argyle sock, fair isle, slip stitch and intarsia work.  Some research will be necessary.  There should be enough contrast to show off the design.  Some leeway for the vest and sweaters is possible but the reviewers still have to be able to see your work and that is not possible if you use a fuzzy, heathered or dark yarn.

Yarn for Projects
 It is also important to select appropriate yarns for your own projects.  Often knitters fall in love with a particular yarn.  Remember, how it looks in the skein has very little relationship to how it will look in a project.  You may love a particular variegated yarn but I can almost guarantee that if you use it in a sweater the colors will pool in very unfortunate spots.  You may love the black cotton you have selected to knit your husband an Aran sweater but the color will not show off the cables and if it rains the sweater will weight 20 pounds. 

My rule (which NO ONE EVER follows) is to buy just ONE skein of the yarn you want to use.  This can save you tons of money in the long run.  Knit your gauge swatch.  You may discover that the yarn obscures the stitch pattern.  You might find that it splits too much or is too slippery or fuzzy or that it hurts your hand.  You might find you can never get gauge with it.  The point is, you are not stuck with 10 skeins of the stuff. 

This photo shows some of the swatches I have made while trying out yarns for projects.  There are three herringbone swatches.  I decided to use the top one.  It was wonderful to work with.  The second one hurt my hand and the third one produced a fabric too soft for the project.  The pink pleated swatch taught me that I wanted to use a lighter weight yarn for the baby dress.  This yarn was too heavy.  The red swatches showed me that this yarn would work for the project.  It looked good in stockinette and it was stiff enough to show off the elongated stitch pattern. 


KNITTING SALON
Salon will be on Saturday from 2-5pm.  I thought about changing the day to Sunday.  The historic house across the street is having a function.  Apparently a minor Civil War skirmish occurred there.  It is a "Living History Day".  Animals, crafts, etc.  Parking may be a bit difficult.

Starting next week I am teaching my finishing class to some of the knitters who come to Salon.   I love teaching finishing.  It should be fun.  We are having it on Sundays since the Metropolitan Opera simulcasts begin in October.  I can't wait!

CURRENT PROJECTS
I had finished pretty much finished the garter stitch skirt before I left for Reno so I took the cabled skirt with me.  I didn't get much knitting done as the casino proved a distraction.  Then we went camping and it got quite cold at night in the Eastern Sierras and Yosemite.  I did manage to finish it when I got home. 


I am quite pleased with how this turned out.  I also like the cabled one as well.  The drape of this yarn is wonderful.  It will really look nice when the wearer is walking.


I had a real epiphany while working on the waist bands.  One of the problems with skirts with elastic in the waistband (which don't have an opening) is that it has to be loose enough to go over the hips.  If you use a standard bind off for the waistband casing you can pretty much forget it.  I researched a bunch of looser bind offs and decided none would work.  What I did was keep the waistband stitches live and use a sort of kitchener grafting technique to close the casing.  Not only is is very elastic it also looks really good on the inside.  I suspect that this is a well known technique but I didn't research it at all so I am happy I figured it out on my own.  The pattern for Cast On will have a link to a video where I demonstrate this.

Friday, September 7, 2012

I have been busy trying to get ready for the meeting in Reno.  I usually ship out my course materials in advance but it slipped my mind.  I'll have to drag everything with me.  Since we are going on a camping trip in California immediately after the meeting I have to get that stuff ready as well.  I guess I know what I will be doing this weekend. 

So far I've received yarn from Miss Babs and Briar Rose for the door prizes at Masters Day.  Hopefully the rest will get here before I leave.  I appreciate their generosity.  I know the attendees will also!

I will not be making a blog entry again until September 28th.  I am going to try and remember to take photos.  I think there will be 10 (!!!) committee members at Masters Day.  I hope to get a photo.

STUDENT NEWS
I reviewed lots of lessons this week.  I will be able to review any that arrive today and Saturday.  My neighbor will take in any that arrive while I am gone.  I will review them on September 12. 

TIP OF THE WEEK
This weeks tip is a continuation of last week's tip.  One thing that I have noticed in many of the lesson I review is that students have difficulty with blocking ribbing and cables.

When you are blocking textured stitch patterns like ribbing and cables, it is very important that you do not flatten the stitches during blocking.  You can flatten them by stretching the fabric too tightly or by over enthusiastic applications of a steam iron.   Blocking ribbing and cables


Compare these two photographs.  These swatches have the same number of stitches and rows.  The first has been stretched during the blocking process.  Notice that the stockinette stitches are open and lace-like.  The ribbing is no longer ribbed.  It is absolutely flat.  In the second photograph, the knitted fabric is not stretched.  The selvedge edges are flattened and pinned and the ribbing is not stretched at all.  It is smooshed into place and the edges are flattened.  Selvedge stitches should not be curled under the fabric.  It makes it easier to finish the edge when they are flattened.

Many knitters try to solve problems with their work through blocking.  As the first swatch illustrates, yes, you can make something larger but it may not look right.  Yes, you can disguise some tension problems by overblocking but they will still be visible.  Blocking should enhance the fabric, not make it look worse.  Lace is the one fabric type where it is almost impossible to overblock it.  Stretching just opens up the yarnovers.  Refer to the photos in last week's blog of the Wasp Wing lace.
Cables present a different type of problem.  When you are planning a cabled project, the first thing to consider is how you want the cables to look in the final project.  For example, in an Aran project you do not want the cables stretched very much.  The beauty of an Aran project is the texture of the different stitch patterns.  When blocking the pieces you would want to be very careful not to flatten the cables and bobbles.  For other types of cable patterns, you may want to stretch the fabric a bit as in the photograph below.   The swatch was blocked the way I wanted the final fabric to appear.  The reverse stockinette is flat but the cables are not flattened.


In photograph below, the swatch hardly looks blocked at all but it is.  For this project, I did not want the reverse stockinette between the cables to be very visible.  By the way, those are dental elastics in the cables.  I use them to  mark the cable row.  It makes it easier to keep your place.  You cut them out of the fabric when you are finished.
 
 
KNITTING SALON
Sue from IN, who recently finished the Basics course and is embarking on the Masters Program came to Salon last week.  It was very nice to put a face to a name (and Ravatar).  We are a very informal, friendly group.  We just sit and knit.  If you are ever in Lexington when we are having Salon, let me know.  You will be welcome.
 
Salon this week will be on Saturday from 1-4pm.  Friends have asked us to the UK game and tailgate party.  I will need the extra time to get ready since it is supposed to be cold.  The next Salon will be on Sunday, Sept. 23.
 
CURRENT PROJECTS
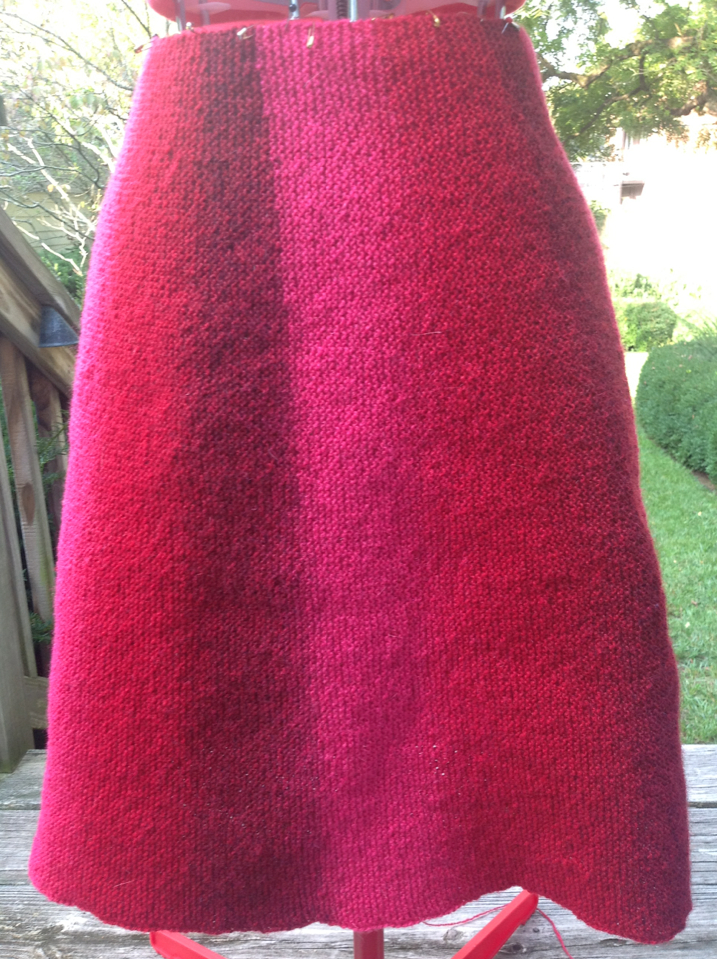
I am so close to finishing the skirt.  I've got about another inch or two.  I've pinned it to the form.  I really like who the yarn is working out.  This skirt demonstrates why garter stitch needs to be blocked.  It just looks a bit lumpy and bumpy.  I'm not sure I will have it finished before I got to Reno.  I have to graft the sides together and pick up stitches for a waist band, not to mention, finish the knitting.  I am going to work on the other skirt on my trip. 


Friday, August 31, 2012

I had lots of time this week to knit which is always a good thing.  I got a good head start on a project, plenty of time to read and caught up on tv series I had recorded.  I feel like it was the calm before a storm.  I remembered to contact Redfish, Baah, Briar Rose and Miss Babs to see if they would like to donate some yarn to give as door prizes at the Masters Day in Reno.  The good news is all said yes.

By the way, I just heard that there is still room in two of my classes.  One is the Shoulders and Seams class.  It is mostly finishing but we do short rows.  The other is my Gauge class.  This is the last time I will teach it.  (Sniff) 

STUDENT NEWS
I got lots of new course orders this week, many due to Sue from IN who finished up the course a few weeks ago.  It makes me very happy that she feels the class was so beneficial that she recommended it to friends.

TIP OF THE WEEK
Here is one of those topics, like tension,  that gives the reviewers in the Masters Program the reputation as the "Knitting Police"...BLOCKING.  If you are doing swatches for the Masters Program (or for my Basics class) all of the swatches must be blocked before they are submitted.  To be properly blocked, the edges should not be curled, the corners should be squared off, and the sides should be the same length.  This is part of "finishing" for the swatch.   It demonstrates your best work.   Tip of the Week

Several factors impact blocking. First of all, you have to use a fiber which can be blocked.  It is next to impossible to adequately block some fibers.  For example, it is next to impossible to block acrylics.  Try knitting a small stockinette swatch.  Photograph it.  Block it properly.  Compare the before photo to the swatch.  There will be almost no difference.  The sides and the top and bottom will be curled.  Yes, you can try steam blocking acrylics but be careful, the fabric might melt.  Part of becoming a Master Knitter is understanding what fiber to select for projects.  If the fiber cannot be blocked, it should not be used for swatches.

The stitch pattern is also a consideration.  Stitch patterns, like stockinette, which produce curled edges should be blocked.  Some knitters don't block stockinette if the edges will be seamed.  Keep in mind it is easier to finish edges which have been blocked.  Some stitch patterns, like lace, MUST be blocked.  If you don't, it won't look like lace.  Trick Question:  Should acrylics ever be used for lace?  See above.  Textured stitch patterns, like cable and ribbing, must be blocked very carefully.  Always consider how you want them to look in the final product.  For example, I would block the pieces for a Aran sweater very differently than I blocked the Medusa Coat (see below) where I wanted the cables to appear like embossed motifs.  Don't stretch ribbing or cables unless you want to completely flatten them.

The blocking method depends upon the fiber and the final results.  For most projects, wet blocking works.  Why?  Think about how you are going to launder the final fabric.  The one thing that I am not going to discuss in this blog is the mechanics of blocking.  Leslie Gonzalez, one of the co-chairs of the Master Hand Knitting Committee has an EXCELLENT video on how to block.  Here is the link:  Leslie's Blocking Video

If you ask most knitters to name three things they don't like to do their answers will include knitting gauge swatches, blocking and finishing.  (I think many knitters dislike doing these things since they aren't sure how to do them properly.)  Unfortunately it is these three things that make knitted garments fit and look hand made rather than home made.  What most knitters like to do is knit.  Their excuse is that these things take too long.  Yes, they do add time to the project but if you put it in perspective how long you hope to have the garment, it may not see that long after all. 

A gauge swatch is what you should do BEFORE knitting the project and blocking and proper finishing are what you do after knitting the project.

I've had knitters complain to me that, yes, they did knit a gauge swatch but the garment still didn't fit.  When I ask them if they blocked the gauge swatch, they look at me as if I have asked a completely ridiculous question.  How on earth are you supposed to know what the final fabric will look like unless you block your gauge swatch?  How can you get an accurate measurement?  Blocking the gauge swatch is essential. 


There is blocking for the Masters Program and then there is blocking in real life.  What do I recommend?  You will always find knitters who say they rarely block.  Good for them.  In some projects you can get by without blocking.  If you are knitting a stockinette baby sweater using acrylic yarn, why bother?  It wouldn't make a bit of difference.

I recently read The Ravell'd Sleeve:The Journal of the Couture Knitting Workshop  by Catherine Lowe (thanks for the recommend Suzanne) and I discovered that I have the same approach to knitting.  I like my garments to have a polished look and proper blocking contributes to that look.  I always wet block.  A friend of mine who is a dyer told me that to properly wet the fabric, it needs to completely absorb the water so I fill a basin with water and I place the fabric on top of the water.  Sometimes it takes minutes, sometimes it takes all night.  I always block my gauge swatches (even garter stitch).  I block the pieces before finishing and I sometimes block again after finishing. 

How you block or whether you block at all is up to you and how you want your final project to look is up to you.  One word of advice....be VERY careful if you use a steam iron.  During my time on the Masters Committee I reviewed thousands of swatches and the worst ones I ever saw were over blocked by steaming.  The stitch patterns were flattened and the fabric was sometimes scorched.  It was enough to make me put my steam iron away forever. 

KNITTING SALON
Salon will be on Saturday this weekend.  Generally in the fall I try to have Salon on Sunday so as not to interfere with the football schedule.  Sad to say, even my friends who were fanatical about going in the past are not going this year.  Doesn't bode well for the Cats.

CURRENT PROJECTS
I did finish up my Medusa coat and I am pleased.  Too bad it isn't cold enough to wear it yet.  I should be able to wear it in Reno.  By the way, I blocked this fabric very firmly.  As I said above, I wanted the snakes to appear embossed on a background of reverse stockinette. 


I finished up the second Leaves of Spring sock but I didn't bother to photograph it.
 
I got started on the side-to-side garter stitch skirt.  It is such a pleasant change from Medusa's Coat where I really had to pay attention.  I can read while working on it.  I used a provisional cast on and the skirt is shaped by short rows.  I selected Kauni Effekts as the color changes work well with the short rows.  I pinned it to the dress form.  Even thought it is garter stitch, am I going to block it? Of course.